
Reef Tank Setup: Step-by-Step Guide Using Natural Seawater
A reef tank setup follows a fixed order: plan the location, install the tank and sump, add rock and sand, fill with saltwater, run the heaters, pumps and skimmer, then cycle the tank with an ammonia source for four to eight weeks. Only then add a clean-up crew, hardy fish and, finally, corals. Patience at the cycling stage decides success.
This step-by-step guide is for UK hobbyists setting up a saltwater aquarium for the first time, or rebuilding one. It covers placement, equipment, a week-by-week cycling and testing plan, the right stocking order and where natural seawater genuinely helps. If you are still deciding between a fish-only or reef system, start with our saltwater aquarium for beginners guide.
Updated October 2026 by the team at Natural Seawater Supplier, a Croydon, London-based supplier of live natural seawater for marine aquariums, delivering across the UK 7 days a week.
Key takeaways
- Allow six to eight weeks from first fill to first fish; cycling is the step most often rushed.
- A saltwater tank is cycled when it turns 2 ppm of ammonia into zero ammonia and zero nitrite within 24 hours.
- Natural seawater arrives at reef salinity (34–36 ppt) with calcium of 400–450 ppm and alkalinity of 7.5–8.6 dKH, but it does not remove the need to cycle and test.
- Stock in this order: clean-up crew, hardy fish, soft corals, LPS corals, then SPS once the tank has been stable for six to twelve months.
- Top up evaporation with RO/DI fresh water, never seawater, or salinity will creep upwards.
Reef tank setup at a glance
| Step | What you do | Typical time |
|---|---|---|
| 1. Plan & placement | Choose size, check floor strength, level the stand | 1–2 weeks of planning |
| 2. Tank & sump | Install, plumb and leak-test with fresh water | 1–3 days |
| 3. Rock & sand | Build the aquascape, add 2–5 cm of aragonite sand | 1 day |
| 4. Fill | Add natural seawater (or mixed synthetic salt water) and check salinity | 1 day |
| 5. Equipment | Heaters to 25°C, return pump, wavemakers, skimmer, auto top-off | 1 day |
| 6. Cycle | Dose ammonia, add bacteria, test until 0 ammonia / 0 nitrite in 24 h | 3–6 weeks |
| 7. Stock | Clean-up crew, then fish, then corals – slowly | Weeks 6–12 onwards |
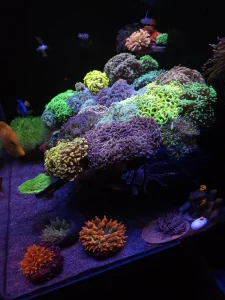
Step 1: Plan your tank size and placement
Bigger is easier. More water dilutes mistakes, so temperature, salinity and nutrient levels drift more slowly. A 200–300 litre system is a sensible first reef; nano tanks under 100 litres work, but a missed top-off or one overfeed shows up within hours rather than days.
Check the weight
Seawater weighs about 1.025 kg per litre. Add rock, sand, glass and cabinet and a 250 litre reef tank can easily total 350–400 kg. On a suspended timber floor, place it across the joists and close to a load-bearing wall; if in doubt, ask a builder.
Choose the right spot
- Away from windows: direct sunlight drives algae and heats the water.
- Away from radiators, doors and draughts that cause temperature swings.
- Close to sockets, with drip loops on every cable and RCD protection.
- With access for water: you will move 20–40 litres a week for water changes. Our delivery drivers can pump seawater straight into the tank, even in a third-floor flat.
- On a level stand: check with a spirit level before any water goes in.
Step 2: Choose the tank and sump
Most reef keepers choose either an all-in-one tank, with filtration hidden in a rear chamber, or a display tank that drains into a sump in the cabinet. A sump adds water volume, hides heaters and the skimmer, gives you room for an auto top-off and lets you add a refugium for nutrient export later. For a first reef above 200 litres, a sump is well worth it.
Before anything else, fill the tank with tap water and leave it for 24–48 hours with the return pump running. Check every seam and joint, and confirm the sump can hold the water that drains down in a power cut.
Step 3: Add rock and sand
Rock is your biological filter: nitrifying bacteria colonise its surface and pores. Most UK hobbyists now start with dry rock (clean, pest-free, cheaper) and seed it with bacteria, rather than live rock, which can carry pests such as aiptasia and mantis shrimp.
- How much rock: modern open aquascapes use less than the old one-pound-per-gallon rule. Around 15–25 kg suits a 250 litre tank and leaves room for flow and coral growth.
- Build outside the tank: plan the shape on a towel, then fix pieces with reef-safe epoxy, cable ties or acrylic rods.
- Rock on glass, sand around it: burrowing fish and shrimp can undermine rock sitting on sand.
- Sand: 2–5 cm of rinsed aragonite sand is easy to keep clean. Leave gaps so water can flow behind and under the rockwork.
Step 4: Fill with natural seawater
Work out your water volume: display plus sump, minus roughly 10–20% for rock and sand. A 250 litre system usually needs around 200–230 litres to fill, which is nine or ten 25 litre containers.
Natural seawater arrives ready to use, so there is no mixing, heating or 24-hour wait. Our water typically tests within these ranges, which already sit inside reef targets:
| Parameter | Natural seawater (typical) | Reef tank target |
|---|---|---|
| Salinity | 34–36 ppt | 35 ppt (SG 1.026) |
| Calcium | 400–450 ppm | 400–450 ppm |
| Alkalinity | 7.5–8.6 dKH | 7–9 dKH |
| Magnesium | 1,250–1,350 ppm | 1,250–1,400 ppm |
| pH | 8.0–8.3 | 7.9–8.3 |
| Nitrate | 0–0.9 ppm | 1–10 ppm once stocked |
| Phosphate | 0–0.05 ppm | 0.02–0.1 ppm once stocked |
| Ammonia / nitrite | 0 / 0 | 0 / 0 |
Still check salinity with a refractometer calibrated in 35 ppt fluid, aerate the water and bring it to tank temperature before adding livestock later. If you mix synthetic salt instead, use RO/DI water and let it circulate and heat for 24 hours; the full marine tank water parameters guide explains what each number means.
New customers can try 25 litres of natural seawater free before committing to a full fill. After that, regular deliveries run seven days a week.
Step 5: Install heaters, flow, skimmer and lighting
- Heating: about 1 watt per litre, split between two heaters so one failure is not a disaster. Set 25°C (24–26°C is fine) and use a heater controller if you can.
- Return pump: aim to turn over the display volume 3–5 times an hour through the sump, allowing for pipe height.
- Wavemakers: total flow of roughly 20–40 times tank volume per hour; softer coral tanks sit at the lower end, SPS tanks higher. Avoid dead spots behind rock.
- Protein skimmer: rate it for your real volume. It removes dissolved organics before they become nitrate and phosphate. Expect a one to two week break-in.
- Auto top-off (ATO): replaces evaporation with RO/DI water to hold salinity steady. It is the single most useful stability upgrade.
- Lighting: keep it off or very low during cycling. Our reef tank lighting schedule guide covers the photoperiod and PAR to aim for once corals go in.
Step 6: How to cycle a saltwater tank
Cycling grows the bacteria that make fish waste safe. Ammonia-oxidising bacteria turn toxic ammonia into nitrite, and nitrite-oxidising bacteria turn nitrite into far less harmful nitrate. The University of Florida’s guide to ammonia in aquatic systems explains the chemistry in more detail. Until those colonies exist, any fish you add is sitting in its own waste.
Does natural seawater cycle a tank faster?
Natural seawater carries naturally occurring bacteria and plankton, which can help seed rock and sand. But the bacteria that handle a stocked tank’s waste only build up on surfaces when they are fed a steady ammonia source. Treat it as a head start, not a shortcut: you still dose ammonia and test until the numbers prove the cycle is complete.
Cycling steps
- Run heaters, return pump and wavemakers at full temperature and flow. Skimmer optional at this stage.
- Add an ammonia source: ammonium chloride dosed to 2 ppm is the cleanest. A pinch of fish food every day or two also works but is slower and messier.
- Add a bottled nitrifying bacteria product the same day, following the label.
- Test ammonia and nitrite every two to three days. When ammonia falls below 0.5 ppm, dose back up to 1–2 ppm.
- When the tank turns 2 ppm of ammonia into 0 ammonia and 0 nitrite within 24 hours, the cycle is complete.
- Do a 25–50% water change to bring nitrate down, then start your normal lighting schedule.
Testing milestones: week 1 to week 8
| Week | What to expect | What to test / do |
|---|---|---|
| 1 | Ammonia high after dosing; little else | Dose to 2 ppm, add bacteria; test ammonia every 2–3 days |
| 2 | Ammonia starts falling; nitrite appears | Re-dose ammonia to 1–2 ppm when below 0.5; test nitrite |
| 3 | Nitrite peaks; nitrate begins to show | Keep feeding ammonia; do not water-change yet |
| 4 | Ammonia cleared in about 24 h; nitrite falling | Dose 2 ppm and test 24 h later |
| 5 | 0 ammonia and 0 nitrite in 24 h: cycled | 25–50% water change; start lighting schedule; expect brown diatoms |
| 6 | Diatoms and film algae (the “uglies”) | Add clean-up crew; test alkalinity, calcium, magnesium weekly |
| 7 | Algae settling down | First one or two hardy, quarantined fish; feed lightly |
| 8 | Stable readings | Weekly 10% water changes; first soft corals if parameters hold |
Timings vary: with good bottled bacteria some tanks cycle in three weeks; with no seeding it can take eight. Go by test results, not the calendar. A brown diatom bloom in weeks five to eight is normal; it fades as the clean-up crew gets to work and silicate is used up.
Step 7: What order should you add livestock?
Add life slowly, in this order, so the bacteria can keep pace with each increase in waste:
| Order | Livestock | When | Examples |
|---|---|---|---|
| 1 | Clean-up crew | Once cycled (week 5–6) | Trochus and Nassarius snails, small reef-safe hermit crabs |
| 2 | Hardy fish | 1–2 weeks later, one or two at a time | Captive-bred ocellaris clownfish, royal gramma, firefish, yellow watchman goby |
| 3 | Soft corals | Once nitrate and phosphate are readable | Mushrooms, zoanthids, green star polyps, leather corals |
| 4 | LPS corals | After 3–6 months of stability | Hammer, frogspawn, torch, duncan, acan |
| 5 | SPS corals | After 6–12 months, stable alkalinity | Montipora, then Acropora |
Add one or two fish every two to three weeks rather than all at once, quarantine new fish where you can, and feed sparingly while the system matures. Our guide to reef-safe algae eaters helps you size the clean-up crew.
Reef tank equipment checklist
Typical specifications for a 200–300 litre reef. Prices are approximate UK retail as of October 2026 and vary by brand and retailer.
| Item | Purpose | Typical spec (250 L) | Approx. UK price |
|---|---|---|---|
| Tank, cabinet & sump | Display and hidden filtration | Reef-ready, drilled or all-in-one | £600–£1,500 (e.g. Red Sea Reefer 250 G2+ around £1,499) |
| Reef LED light | Coral photosynthesis | One or two programmable fixtures | £350–£800 (e.g. AI Hydra 32 HD or Red Sea ReefLED 90, around £390–£400 each) |
| Return pump | Moves water from sump to display | 3–5× display volume per hour | £100–£250 |
| Wavemakers (×2) | Flow around rock and corals | 20–40× volume per hour in total | £150–£400 |
| Protein skimmer | Removes dissolved organics | Rated for your actual volume | £200–£450 |
| Heaters (×2) + controller | Holds 24–26°C | About 1 W per litre in total | £50–£120 |
| Auto top-off | Keeps salinity stable | Optical or float sensor, RO/DI reservoir | £80–£200 |
| Refractometer | Salinity | Calibrated with 35 ppt fluid | £25–£60 |
| Test kits | Ammonia, nitrite, nitrate, phosphate, alk, Ca, Mg | Reef-grade kits | £100–£200 |
| Rock & sand | Biological filter and aquascape | 15–25 kg rock, 2–5 cm aragonite | £200–£400 |
| Seawater | Initial fill | About 200–230 L | About £72–£80 in natural seawater (9–10 × 25 L) |
Looking after your reef once it is set up
Once stocked, settle into a simple routine: a 10% water change each week (our guide to how much and how often to change water explains the maths), RO/DI top-off via an ATO, and weekly tests of salinity, alkalinity, calcium, magnesium, nitrate and phosphate. Log results; trends matter more than single readings.
Common reef tank setup problems
| Problem | Likely cause | Fix |
|---|---|---|
| Ammonia won’t drop after 3+ weeks | Too little bacteria, low temperature or ammonia overdosed above 4 ppm | Water change to bring ammonia under 2 ppm, re-dose bacteria, hold 25°C |
| Nitrite stuck high | Nitrite-oxidising bacteria lagging | Keep feeding small ammonia doses and wait; do not add fish |
| Brown dust on sand and glass | Diatoms using silicate in a new tank | Normal; clean-up crew and time |
If you are switching an existing tank over, our article on why UK reefkeepers use natural seawater covers how to change over safely.
Filling a new tank?
Work out your volume with our saltwater fill calculator. We can deliver the first fill and pump it straight into your aquarium. Get a quote for your postcode or claim 25 litres free, or call 020 7183 4175.
Frequently asked questions
How long does it take to cycle a saltwater tank?
Most saltwater tanks take three to six weeks to cycle with an ammonia source and bottled bacteria, and up to eight weeks without seeding. The cycle is complete when the tank converts 2 ppm of ammonia to zero ammonia and zero nitrite within 24 hours. Go by test results, not the calendar.
Can I use natural seawater to set up a reef tank?
Yes. Natural seawater arrives at reef salinity with calcium, alkalinity and magnesium already in the ranges corals need, so there is no mixing or waiting. You still need to check salinity with a refractometer, match temperature and cycle the tank before adding livestock.
Does natural seawater mean I can skip cycling?
No. Natural seawater carries naturally occurring bacteria that can help seed a new tank, but the bacteria that process a stocked tank’s waste must grow on the rock and sand. Dose ammonia and test ammonia and nitrite until both read zero within 24 hours.
What size tank is best for a first reef tank setup?
A 200 to 300 litre system is the easiest first reef because the larger water volume keeps temperature, salinity and nutrients stable. Nano tanks under 100 litres can work, but mistakes show up much faster and need daily attention.
What order do you set up a saltwater tank in?
Plan the location, install and leak-test the tank and sump, add rock and sand, fill with seawater, run heaters, pumps and skimmer, then cycle. After cycling, add a clean-up crew, then hardy fish, then soft corals, LPS and finally SPS corals.
Bottom line
A successful reef tank setup is about order and patience: a solid, level location, good flow and filtration, a properly tested cycle, then livestock added slowly from clean-up crew to SPS. Natural seawater gives you reef-ready water from day one and makes weekly water changes simple. If you would like it delivered or pumped straight into your new tank, get a quote for natural seawater delivery.
Sources
External sources cited in this article (checked October 2026):
- Ammonia in aquatic systems (University of Florida IFAS)
Seahorse Aquarium Guide: Tank Size, Setup & Care
October 19, 2026 @ 12:40 pm
[…] vs synthetic salt, or try 25 litres of natural seawater free. Setting up from scratch? Follow our reef tank setup guide and cycle the tank fully before adding […]
Saltwater Aquarium for Beginners: 2026 UK Guide & Costs
October 19, 2026 @ 12:35 pm
[…] This guide covers the decisions to make before you spend anything: fish-only versus reef, tank size, realistic 2026 UK costs (including electricity), the easiest fish and corals, the ten mistakes beginners make and the maintenance routine that keeps a marine tank healthy. For the hands-on build and cycling, follow our step-by-step reef tank setup guide. […]